
The second edition of our Four Four Studio Tips comes courtesy of one of Ireland’s most formidable techno producers Doug Cooney. The RLSD boss deep dives into his production process, showcasing the various stages of his creative process in a 14-step masterclass that is essential reading for any producer.
Doug Cooney‘s pedigree for producing top-tier techno at the highest level has made him a staple in Ireland’s techno scene. Doug’s deep-rooted love for the finer details within techno production has given him an upper hand when crafting fine-tuned tools in the studio and has also landed him roles as a teacher at the Bray Institute of Further Education and as head tutor at Real Sound – Doug’s learning platform for music technology.
Doug’s previous releases have been doing the rounds on the world stage and have thoroughly demonstrated the Wicklow natives’ ability to sling out top-shelf techno. Crafting high-octane and effective techno is not easily done, and Doug’s lengthy list of luminary support speaks for itself. His productions have received support from Dave Clarke, Amelie Lens, Ben Sims, Luke Slater, Rodhad, KR!Z, and Answer Code Request. Doug’s tracks have also been remixed by Aiken, Binny, Lee Holman, and Dystopian Records Jon Hester, proving his calibre in the international arena. The RLSD head honcho has also signed records with respected labels such as Orbis, GND, Gynoid, Frenzy, EFR, Bastardo Electrico, N&N Records, Research & Orgone, alongside RLSD Records his own imprint laying a strong foundation for his future in music.
Studio Tip 001: Save as Default Channel
Let’s get the ball rolling here and knock the cobwebs off with something simple and practical. Getting organised is key when working with Ableton and any DAW (Digital Audio Workstation) or hardware interface. Ableton has a function to save as a default channel. Ableton’s session view can have multiple channels emulating the form and functionality of an analog desk in the digital domain. An understanding of analog desks, channel strips, EQ sections, and auxiliaries allows us to create channel strip layouts in Ableton.
Simply right-click on the top of the Ableton Track Title Bar. A menu will pop up, click on Save as Default Audio/MIDI Track. (Whatever EQ you use + utility). As Ableton automatically has auxiliaries built in the form of send and return channels I added an EQ and gain stage to mimic a basic channel strip with the same functionality as an analog desk.

Studio Tip 002: Kick Creation Template
It’s essential to establish a strong foundation when starting a Techno track. Beginning with a powerful kick is key as it sets the tone for your composition. A good kick can have anything up to four layers but that being said a good kick can also have 1 layer with the addition of some insert or parallel processing effects. Two to three kick layers with some processing usually gets the job done for me but feel free to tweak and find a better way that works for you. Try to choose sounds with low, mid, and high characteristics alongside found sound elements to add texture and character. Each layer can have an Insert EQ applied, with further shaping using Ableton’s Clip Fade in/out handle function in the arrangement view if required. I use a kick-making template for this part of the process. This is useful for keeping the CPU low. Kick Loops are exported for use in the track and in live performances delivering more energy and weight on the dancefloor.
Kick making template Ableton:

Notes on EQ: Use your ear and listen to the EQ, think why instead of what? It’s better to acquire the skill of EQ rather than trying to find the perfect classic EQ with that signature sound. EQ is a tool for you to create your own sound, not someone else’s. Yes, a few hard and fast tried and tested techniques will be implemented and honoured with great results. Use these suggestions as guidelines encouraging you to push the boundaries when using EQ, and further develop the relationship between your technical actions and monitoring setups.
Studio Tip 003: Adding Sub/Bass Layering & Mixing
Composite mixing is when sounds are layered creating depth and contrast. A sub-layer with one or two bass layers will usually get the job done depending on the track. This is useful when adding rumble and weight to tracks at the low end of the frequency spectrum. It’s important to balance between the kick and sub/bass elements at this stage of the mixing process.
Ableton Session View
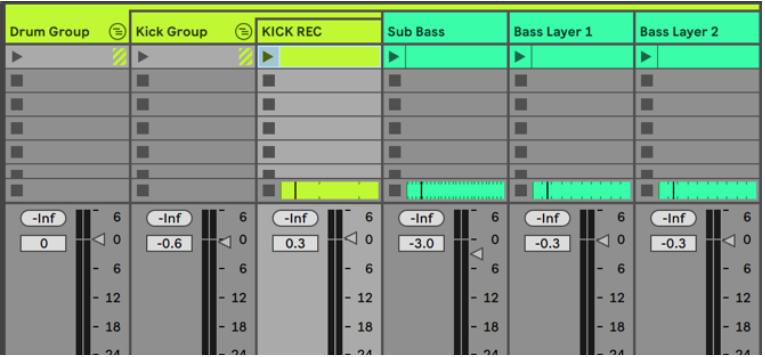

The bounced kick channel will be cut from approximately 40hz with a 24/36db roll-off.

Sub Layer (EQ Low cut 70hz – High Cut 100Hz) & Bass layer (1 Low Cut EQ 100Hz – High Cut 200Hz)
Less is more at this stage so if you are happy with a sub and 1 Bass layer then trust your ears and move forwards. If not repeat this process twice and layer accordingly. Be sure to EQ correctly and don’t overlap frequency content where possible, be precise and work by the numbers. Use as Sharpe gradient (roll-off/cut-off frequency) try a 24/36db roll-off, this adds punch and clarity to the mix. Source material should be recorded and further experimented with to find a sweet spot in the audio. Push the recorded audio clips’ pitch values into lower registers and see what you come up with. Trust your ears!
Studio Tip 004: Spectrum Analyzer function
A functional mix feature provided by the Pro – Q3 can be applied to assist when mixing. This tool allows for communication between individual devices set up on channels as insert effects. This is useful when identifying overlapping or masking frequencies. Enable the collide function to highlight colliding frequencies. This spectrum analyzer function identifies and speeds up the EQ process when dealing with the kick and bass sounds. Kick and Bass often have collision occurring due to the frequency content residing in the lower end of the spectrum. This process can be applied at the kick creation stage also to polish and shape a punchy kick sound. Mix as you go in your process laying a strong foundation for a quality production value pre-mastering, remember! Good mix = Good master!

Studio Tip 005: Creating a Groove
Choose a sequencer and synth. Try the Wavetable in Ableton, it’s a powerful and dynamic wavetable synth. Tune the sequencer to a low register by using your ears to find a tonality that will complement and enhance your Kick sound. I use the ML – 185, and MDD – Snake Max for Live sequencers alongside HY – Sequencer Collection 2. Start with the Max for live ML – 185 and set the Length to 3 out of 8 tics and set the pitch values to lower registers ranging from 0st -24st (Semi-Tones). Turn on and off, stage modes until you land on something. When you have generated some Audio content, record it for further processing in Ableton’s Clip view. Adjust the transposition tuning to a pleasing pitch value, namely find and work with the sound until it fits in context with your existing track elements.

Studio Tip 006: Sequencing Techniques – Using Basic Music Theory
Apply this simple technique using Ableton’s inbuilt MIDI Device Chord to add a dark or old-school feel to your tracks. A Dyad or Chord can be created from a Simple 1 Note MIDI Sequence. This method is particularly effective when MIDI Values are recorded and further edited in Ableton’s Session or arrangement view. Insert Ableton’s inbuilt chord MIDI effect into your channel to add some Polyphony and layers to any Sampled or Synthesized sounds.

In the example below a single MIDI Note generated by the Max 4 Live, MDD SNAKE sequencer creates a minor chord defined by the sequencer’s MIDI note Output. Scale is an Ableton Inbuilt device allowing MIDI data to be outputted in a specific defined musical scale. Scale can be turned on when recording your sound and sequence. Try Scale and Chord as solo insert MIDI effects and also in conjunction with each other, both methods are effective. I find the best results are achieved by editing MIDI Clips post-recording further developing musical ideas.

Studio Tip 007: Sequencing – Techniques Adjusting Loop Lengths
Experiment by adjusting the loop length end punch out point, try using 3/16th, 5/16th, 6/16th, 7/16th, and 12/16th Lengths in an Ableton MIDI Clip. Combine Ableton MIDI Devices chord, and scale discussed in tip 006 to create your own interesting and evolving Sequences. Use these techniques and experiment until you discover something that works for your ear. Remember there is no right or wrong way to sequence so explore MIDI pitch values and loop lengths until you land on something. Recording and editing MIDI Values will allow for better results alongside contributing to future Live Performance preparation.

Studio Tip 008: LFO – Modulating (Low-Frequency Oscillator)
Use LFO to add movement & modulation to sampled or synthesized sounds. LFO is a frequency that creates a pulse. That pulse can be mapped with most parameters in Ableton, Effects, and VSTs. This can serve to regain some movement lost from sampling live hardware or alternatively add interest to an existing synthesized sound. Click Show/Hide multimap parameters to assign multiple instances of LFO defined by a min and max range. Assign the LFO to a filter cut-off frequency on a Synth or Sampler and adjust the Rate and Depth.

Studio Tip 009: Ghost notes – A simple but effective sequence technique
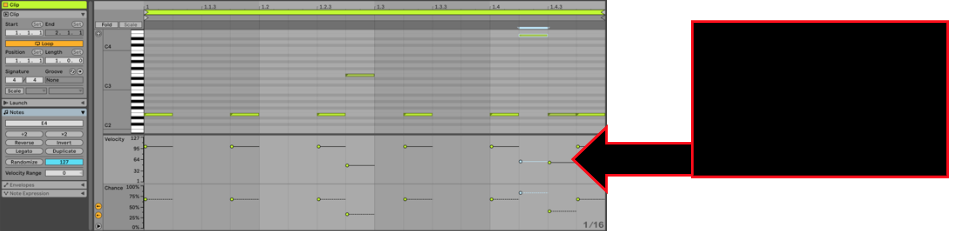
Use ghost notes in your MIDI Clip programming. This technique creates a lower or higher velocity hit on the same pitch or alternatively, a higher or lower pitch value in the MIDI clip. Add the chance function from Ableton 11 to add more variation and movement to static loops. Multiple midi clips can be used to create drum fills or middle eight sections to carry your composition when things are getting a bit loopy and sterile. Experiment with this simple technique to add movement, variation, and interest to repetitive loops.
Studio Tip 010: Setting levels for Headroom and Premaster
VU Meters give a good indication when setting headroom and premaster output volumes. VU represents the signal level set by gain staging. The volume of the overall signal left and right can be linked and adjusted using the left trim pot. In this studio tip position, the VU Meter on the master channel and set the trim left Input volume to approximately -3db. Define the appropriate level for pre-mastering by setting the needle at -3db or as close as you can. Now adjust the volume of the channel so that the Bass mixed with the kick is at 0db on the VU Meter.
1: Set Kick Level Via Master Channel VU at -3db, 2: Mix the Base element & adjust the level to 0db

The kick and bass will be sitting nicely together allowing the bass to come through in the mix without compromising the integrity of the Kick. This method of VU mixing is implemented as a result of the way hardware was engineered, expecting a signal of -18dbfs (Decibels relative to full scale) Analog is 0dbvu analog. VU is a visual reference so be sure to trust your ears. Adjust levels to taste shaping and develop your own sound when applying the VU mixing technique.

Studio Tip 011: Recording through Tape Machines
This technique has been developed due to the true analog days. Integrated this method into your production arsenal with great results. Using clean and linear settings on the analog tape emulation allows the mix elements to glue together naturally. You can create a virtual 16-track multi-tape desk. This approach can be somewhat time-consuming but worth a try to see if it works for your production process. Drums sounds benefit particularly well from this process in adding incredible punch to the Low End. Raise input -18dm RMS / -6db on the peaks. Trim to -18db a conservative level, then drive the input into the tape machine at around 0db. Be sure to unlink the input and output if this feature is available on your tape emulation device as this allows for better control over the sound. This process adds character and extra harmonics to the sound by the compression and saturating applied using tape emulation. Coloured-sounding compression gives separation in the mix introducing clarity and definition.
Mixdown Template 001:

1: Set Level at -18db on VU Meter 2: Raise the input gain on the Tape Saturation to 0db

Studio Tip 012: Processing sounds through a Mixdown Template:
Create a mix-specific template in Ableton or a DAW of your choosing. This technique aims to emulate a high-end mixing desk with a dynamic sound. Approximately ten channels with three groups should be enough depending on your workflow. However, multiple instances of high-end emulation VSTs can drive the computer DSP making sessions unworkable. As a result of this, it’s best to work out what workload your computer can handle and then modify the setup accordingly.
(Recommended: Plugin Alliance – BX Console SSL 4000 E)

Mixdown Template 002:
Studio Tip 013: Side chaining by Ducking specific frequency ranges.
Side chaining using compression is somewhat of a traditional approach when signal ducking. This approach triggers a compressor to control the overall signal as opposed to a specific frequency band defined by the user. Ducking specific frequency bands allows the user to set the range where the side chain compression occurs in relation to the amount of the input signal. This is a precise method of controlling the ducking that occurs, allowing for a narrow or broad band of the frequency spectrum to be side-chained.

Studio Tip 014: Tonal Balance Control
Izotope Tonal Balance Control is worth considering when preparing your final mixes for mastering. A reference track or preset sound is loaded into the device. This creates a four-band mix showing each band in relation to the loaded reference sound. A guide mix is generated for the low, low-mid, high- mid and high-frequency bands. If your mix resides outside of the balance control for each band you can apply some EQ to add or subtract frequencies. The aim is to get an even distribution of energy across the mix spectrum in relation to the referenced material. A useful feature of this device is that you can solo the individual frequency bands to hear what mix elements are present. This is helpful when addressing levels to balance your mix and also to train your ears to where specific sounds reside in the Frequency Spectrum. This is an effective tool to get pre-masters ready for the mixing and mastering stages.
Recommended: Izotope – Tonal Balance Control

Thank you for taking the time to read my Tech Talk. If you would like to learn more about the ideas discussed or book your very own masterclass Contact Real Sound. Alternatively, if you have an interest in booking a full-time music technology course at BIFE contact: douglascooney@kwetb.ie / bifeenquiries@kwetb.ie
Doug Cooney: Production Tech Spec
- Software: Ableton Live 11, RME Total Mix.
- Hardware List: Mac Book Pro (2.2GHz Intel Corei7 16GB Ram), Akai Apc 40 Mk2, Beatstep Pro (Atturia), Darktime Sequencer (Doepfer) Waldorf – Blofeld, Boss Pedals – Reverb RV-7, Delay DD6, Tera Echo.
- Sound card: Allen & Heath Xone – 96, RME Fireface UC.
- Modular Synthesiser: (Inteligel Performance case, Atlantis, Rainmaker, Dixie 2 Osc X 2, Dixie Control, Korgasmatron 2 Filter. Clock Divider (Doepfer) Env Gen (Manhattan Audio), Gate (Pitsberg Audio), Swing module, Drips (Dreadbox), 303 (Acid Lab) Mixer (Manhatten Audio)1U: Send & Return Module, MIDI Clock.
- Storage: Hardware: Lacie 2TB, 4TB x 2. Cloud: Dropbox, Drive, SoundCloud


Referenced material:
- Home of Sound: Various Courses,
- Linear System: 2hr Masterclass,
- Kirk Degiorgio: How To Make Dark Room Techno,
- Tom Hades: ADE 2019 Question of 50hz